Description
Sourdough starters are so easy to get going. The below recipe also includes an easy sourdough loaf.
Ingredients
Scale
For the Sourdough Starter
- 200g (7 oz) Strong White Bread Flour, plus extra for additional feeds
- 200g (7 floz) Tepid (not quite hot and not quite cold) Water, plus extra for additional feeds
- Small Handful Raisins
For the Sourdough Loaf
- 400g (14 oz) Strong White Bread Flour
- 2 tsp Table Salt
- 200g (7 oz) Sourdough Starter
- 250g (8 floz) Cold Water
- Additional flour and semolina for dusting
Instructions
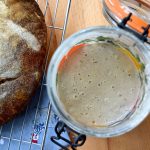
- To start your starter, combine half of the flour and half of the tepid water in a large, lidded jar (I always make my sourdough in Kilner jars) with the raisins. Seal the jar, and leave it at room temperature for 24 hours.
- Add the rest of the flour and water, and leave it again for up to three days, until there are loads of bubbles appearing through the mixture, and it is grown at least a little.
- Pour three quarters of this away (along with the raisins!), before feeding it with enough flour and water to make it up to its original size. From then, just feed it with a little flour and a little water each day. If you need to go away for any reason, you can just stash it in the fridge for up to 10 days without a feed.
- To make a loaf, use your starter when it has not been fed for 24 hours. Weigh out the flour and the salt, and rub the salt into the flour with your fingertips.
- Create a well in the middle, and add 200g of your starter and the water. Mix the dough until everything is combined, and has been brought together in a wet ball.
- Flour a clean work surface well, and knead the dough for at least 10 minutes until it is springy. Leave it to prove for at least 4 hours at room temperature in a covered bowl (I like to use cling film, but a damp tea towel also works), until it has at least risen a bit, if not doubled (because all bread recipes ask for your to leave the dough until it doubles in size, right?)
- Turn the dough out again onto a floured surface, and shape the loaf. (There are some great step by steps on how to knead and shape bread here). Return it to the bowl, and cover again, leaving it for at least another 3 hours.
- When you’re ready to bake, pre-heat the oven, as well as the tray you plan to bake your loaf on in the oven at 240 degrees (or as high as your oven will go).
- Once the oven is up to temperature, drop it to 210 degrees (410 fahrenheit), and slide the bread onto the hit baking tray.
- Bake for about 40-45 minutes, until the loaf is golden, and if you turn it over and tap the bottom it sounds hollow. Allow the loaf to cool before you slice it.