Description
This easy white loaf does not require any kneading, and can be measured out entirely with a mug – genius!
Ingredients
Scale
- 2 1/4 mugs Strong White or Plain (All Purpose) Flour
- Enough salt to just coat the bottom of the mug
- 1 x 7g Sachet Fast Action or Instant Yeast (I use Allison’s, the green packet)
- 1 mug full of tepid water (water that feels neither warm or cold)
Instructions
- Measure the flour into a large bowl, and measure out the salt onto one side of the bowl, pour the yeast into the other. Rub the salt and the yeast into the flour on their respective sides of the bowl with your fingertips.
- Make a well in the middle and pour in the water. Mix until you have a uniform dough, using the dough to wipe the excess flour off of the sides of the bowl. You can use a spoon or fork for this, but I usually just use my hands in a claw like motion.
- Cover the dough in the bowl with a damp towel or cling film and leave to rest for at about 40 minutes. You should notice that it has grown a bit. Wet your fingers on one hand to stop the dough sticking to them and, sliding your fingers under the dough in the bowl lift half of it. Fold it over and repeat, turning the bowl about 90 degrees each time. You should feel the dough getting smoother and tighter. When it is smooth cover again and leave for about an hour until it has doubled in size. Alternatively you can leave it in the fridge, where it should take 8-12 hours to rise.
- Now it is time to shape your dough. The book has a fantastic method for doing this, but if you are crazy enough to not want to buy the book, you can use my old technique of stretching out a smooth top and tucking all the edges under the ball. Think putting a fitted sheet onto a non existent mattress.
- Place on a floured baking tray and cover again, but leaving room for it to grow for another hour.
- About 20 minutes before finish time pre-heat your oven to 210 degrees. (Deviating from the recipe for the moment and adding in a few notes of my own, everyones ovens are different. When it comes to baking bread you need to just see how your loaves turn out at different temperatures, also to suit your own preferences. As a general rule, if your oven is fan assisted you should drop the temperature for baking anything by 10 to 20 degrees. I’ve found when baking bread in my oven the 10 degrees drop gives a very dark and crisp crust, and 20 degrees gives still a good, but a bit softer crust with a colour more like you are used to getting with your bread. It is the temperature I cooked the above loaf with.)
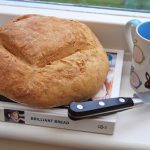
- Score your bread with a very sharp or serrated knife and bake for 40-45 minutes until your loaf has a good colour (Rachel tips: and if you tap the bottom it sounds hollow and allow to cool a little before slicing!)