Description
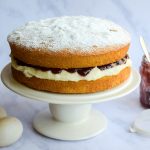
A classic Victoria Sponge Cake filled with raspberry jam and buttercream, but made with duck eggs for a richer, fluffier sponge, rather than hens eggs.
Ingredients
Scale
For the Victoria Sponge
- 3 duck eggs
- margarine or unsalted butter, at room temperature
- golden caster sugar
- self raising flour
- 1 tsp vanilla extract
- 2 tbsp water from a just boiled kettle
For the Filling
- 200g icing sugar, plus extra for dusting
- 100g unsalted butter, at room temperature
- 1/2 tsp vanilla extract
- milk
- low sugar raspberry jam
Instructions
- Pre-heat the oven to 180 degrees (355 fahrenheit) and grease and line two 20cm/8″ shallow cake tins (ad) with rounds of baking parchment.
- Weight the duck eggs still in their shells. You’ll need margarine or butter, sugar and flour in the same weights as the duck eggs to get a perfect cake every time!
- In a large bowl and using an electric hand whisk whizz together the margarine or butter, and the sugar until light, fluffy and pale.
- Beat in the eggs one by one, along with the vanilla extract. If you’re using duck eggs from a farm rather than a supermarket, crack each one into a small dish to check it is okay before adding it to the mix – I had a rotten one the other day and it was one of the worst things that had ever been in my kitchen!
- Beat in the flour until combined, followed by the two spoonfuls of just boiled water to create a smooth batter.
- Divide the mix between the two cake tins, making sure you have smooth tops for even baking. Transfer to the oven and bake for 20 minutes until the sponges are springy, golden, and if you insert the tip of a cake tester or a very sharp knife it comes out clean.
- Run a very sharp knife around the edge of each cake to help them come out of the tins later, and leave them to cool on wire racks. Once the tins are cool enough to touch, carefully turn out the cakes to cool completely. To get an even cake, choose the best looking sponge for the top and cool that one right way up, and leave the other to cool upside down.
- Meanwhile to make the buttercream filling, beat together the icing sugar, butter and vanilla extract until smooth. If you need to loosen the mixture a little to make it more spreadable, add a tiny splash of milk. Only do this bit by bit, however, because if you add too much at once it can cause your icing to split. (If this does happen, add a little more icing sugar, beat hard, and keep doing this until it comes good again!)
- Once the sponges are completely cool place the bottom sponge upside down on a cake stand or serving dish. Spread the top with the buttercream – I use a small palette knife for this – just to the edges. Spoon a generous amount of raspberry jam on top and also spread it to the edges with the back of the spoon before popping on the lid. Using a sieve (I have a mini one for things like this #ad) dust the top of the cake generously with icing sugar (though sometimes in our house we use vanilla infused caster sugar instead!) – this will help cover up any bubbles or imperfections in the finished sponge.
Notes
I’ve only included British measures here, unusually, because this cake really is better made with margarine rather than butter, and self raising flour than a plain / all purpose flour and baking powder mix – both ingredients very hard to get hold of in the USA.
