How to DIY An Evergreen Festive Swag For Your Front Door
Okay, time for something a bit different this Christmas! While I don’t tend to DIY every day I do love making the odd handmade item, and these days I tend to do all my projects around Christmas, usually to decorate the house. As most of you already know I spend an inordinate amount of time on Pinterest, and this year I’ve noticed there is a big trend for hand-making your own swag for the front door rather than placing a Christmas wreath there instead. I’ve made my own wreathes before and without a specialist base or a handy supply of super-bendy willow branches they can be tricky to get nice and round, so I love the idea of making a free-form swag instead.


So what exactly is a swag? Basically, it’s a gathered bunch of leaves or evergreens brought indoors for decoration, usually with added Christmas ribbon. Because I made this in advance to put together this tutorial and we did not want the postman to think we were bonkers hanging Christmas decorations during the first week of November, after shooting I brought it inside to hang by the fireplace, and I realised how lovely a pair of swags might look either side hanging from the lamps, so if you have a shared front door or just, like us, loads of space to decorate, swags are also great to make to bring a bit more green than your Christmas tree inside this holiday season.

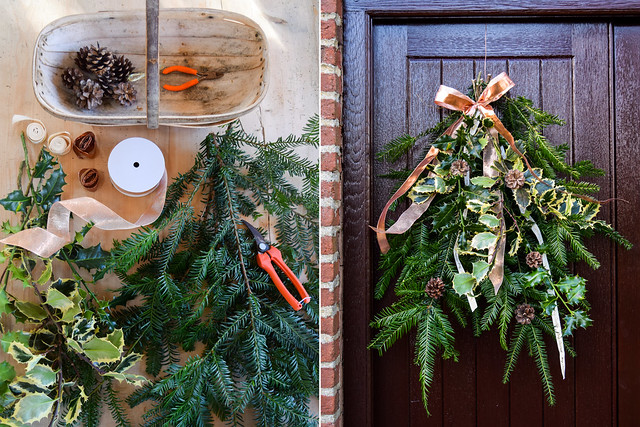
So, what will you need to make your own festive front door swag? While I found everything I needed in the garden or in my Mum’s ribbon box (if you like doing crafts and making things pretty and you don’t have a box full of old ribbons you’ve taken off things to re-use, you should start one – I find it so useful!) and if you live in the countryside I encourage you to do the same, I’ve made sure to stick to using branches of evergreen and holly, because I know these are readily available at most good city florists around December time.
You Will Need
3-4 Bushy Branches Evergreen (I used English Yew)
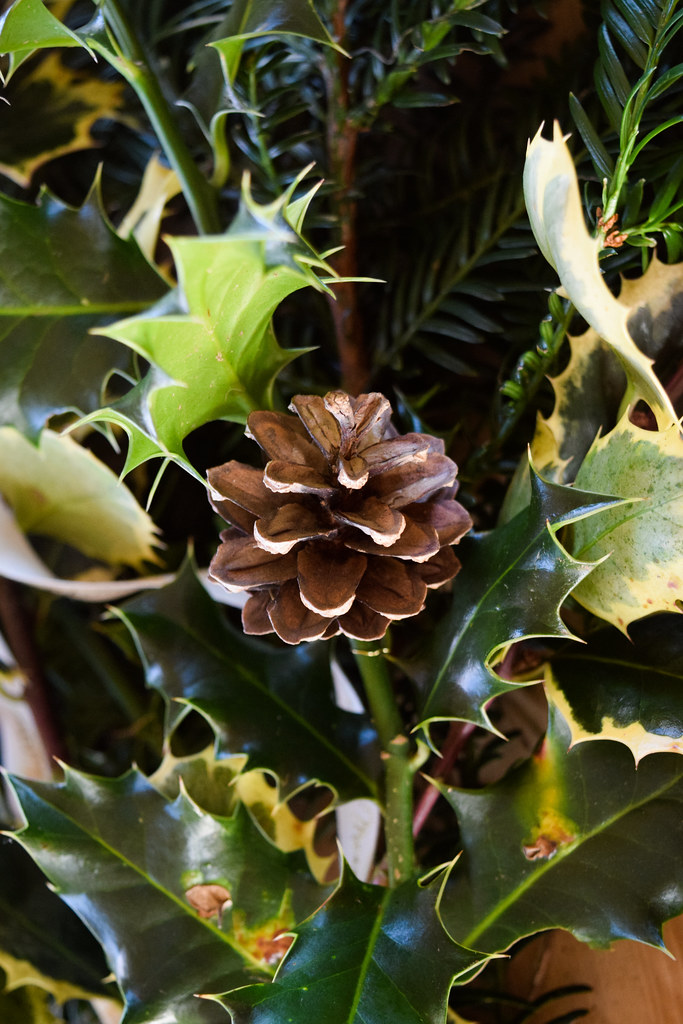
2-3 Large Sprigs Holly (I used a mix of Common Holly and variegated green and yellow holly)
2 Wide Wired Christmas Ribbons (I used this gold number and this copper one from Cox & Cox [ad])
Long Length Contrasting, Narrow Christmas Ribbon (I used an old Cox & Cox one, but this one is the same but with copper lettering rather than gold [ad])
Very Thin Ribbon [ad], for tying
5 Small Pine Cones
Thin Jewellery Wire [ad]
Scissors
Wire Cutters
Pruners
Honestly, while I’ve linked you in to the ribbons I’ve used because to be perfectly honest I’m a bit obsessed with Cox & Cox’s Christmas wrapping and I think their ribbons are beautiful, re-use what you’ve already got. The skinny lengths or ribbon you use to secure the bow really don’t matter, and as long as the other three ribbons go together and two (one slightly narrower than the other) have wire in them to make a nice bow from the top, go with what you think looks pretty! My mother collects pine cones on her daily walks so there is always a big bowl of them in her study, but just use what you want for decoration, from more ribbon to tree ornaments.


- Shall we get going? To start, gather your branches. Be careful not to spike yourself with the holly, and if you’ve gathered the branches yourself, pick them over for any nasties. Lay them out on the table, starting with the evergreen and placing the holly on top to see how you want them to sit. Try to sit them so the evergreen is slightly longer at the back, and the holly is well spaced out. When placing the holly, think of the rule of three: when decorating anything, using an odd number of things is always visually more pleasing than using even numbers, unless you’re using pairs going for the whole symmetry thing. Make sure you leave a good amount of branch space at the top to tie the swag.
- Using the thin ribbon for typing, tie he branches tightly together at the top (tying the knot behind the swag so it does not spoil your design, trimming any excess once it is tight), leaving a good few inches of branch exposed at the top. The strength of the knot might have changed your arrangement a little, so use the pruners to shape the swag how you want it, and trim the branches exposed at the top to a similar length, though be sure not to cut them down to near the ribbon!
- Thread the length of medium ribbon through the knot, and pull it so that it sits either side of the swag as decoration, one length a bit longer than the other. Smarten up the ends with a pair of scissors.
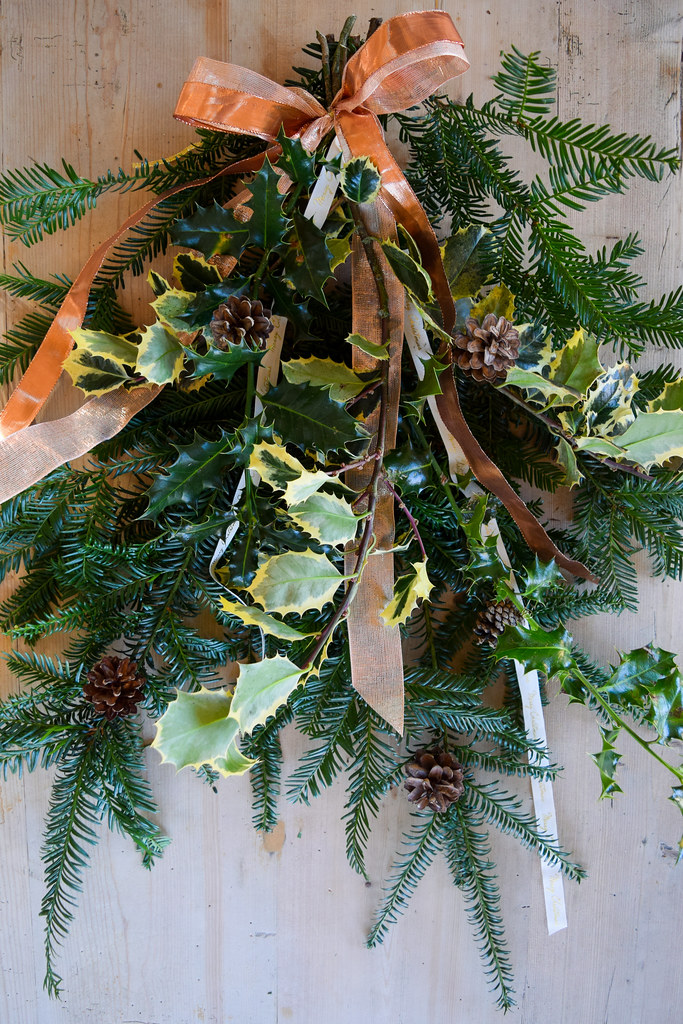
- Next, tightly bind a length of jewellers wire to the base of each pine cone and wire them to the branches on each side, adding a bit of interest to the swag.
- To make the bow for the top, lay the two wired ribbons on top of each other, the slightly narrower one on top so that you can see the wider one peeking through at the edges. Keeping the ribbons joined, fold them over each other as if you were shaping a bow with two tails at the bottom, and secure in the middle with the tying ribbon, leaving long lengths still attached to tie the bow to the swag. Fluff everything up using the wire to help you shape the bow, and trim off the ends, leaving them nice and long, but even and smart!
- Finally, tie the bow to the swag and tidy everything up a bit. Use any excess tying ribbon to attach it to the front door – we found a length of copper wire attached to a hook inside that was thin enough that you could still close the door over it did the trick!

I’d love to hear your thoughts – especially if you try your hand at making your own festive front door swag or something to bring indoors – but also just if you’d like to see some more festive DIY projects next Christmas!
Hi, I'm Rachel!
I'm a food writer, professional recipe developer and cookbook author living in the English Countryside. I love creating easy, accessable recipes filled with vibrant world flavours that are manageable on busy weeknights. Simple and delicious dinners, from my kitchen to yours!

My Book
One Pan Pescatarian: 100 Delicious Dinners – Veggie, Vegan, Fish
My second cookbook contains 100 delicious dinner recipes, all of which are either vegetarian, vegan or which celebrate fish and seafood - all cooked in either one pot or one pan.*
Buy Now


Discussion